How to Install a Chain Link Fence

Below you will find step by step instructions on how to accurately install a chain link fence using the traditional method
OVERVIEW
- Estimated Completion Time: 1 day (2-3 days if using concrete)
- DIY Experience Required: Medium-High
- Tools Required: Spade, post level, stretcher bar, fence puller
- Materials Required: Chain link fence, end post, intermediate post, tension wire, fence ties, tension bands, top rail, end post cap, intermediate post cap, tension bar, concrete (optional)
| Need materials for your project? Shop chain link fencing rolls and accessories with next-day UK delivery. |
CONTENTS
- Anatomy of Chain Link Fence
- Calculating the materials you need
- Marking and Installing End Posts
- Marking and Installing Your Intermediate Posts
- Add Bands and Caps to the Posts
- Install the Top Rail
- Hang the Fence Mesh
- Stretching the Chain Link
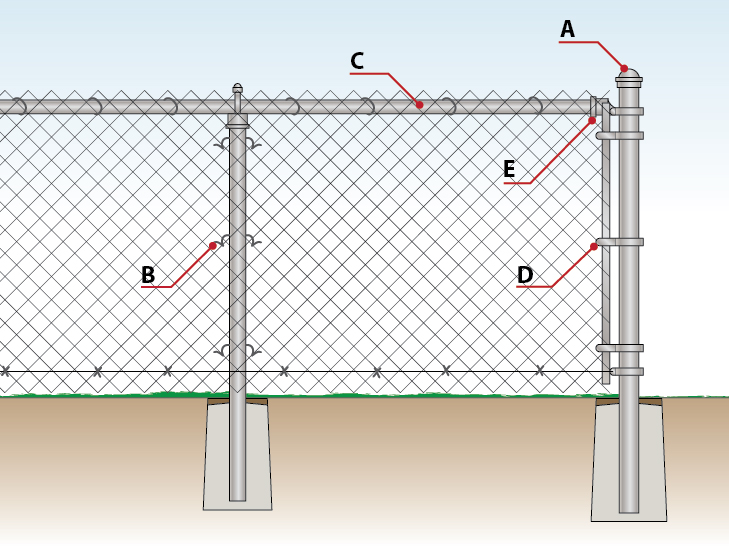
FENCE ANATOMY

STEP 1) Calculate How Much Material You Need

- Mark the exact spot where you want to locate the corner, gate and end posts with a spray paint or something similar.
- Measure the total length between the end posts.
- You will now be able to order the correct length of fencing you need (normally shown in meters).
- Once you have measured your perimeter, check our Chain Link Roll Sizes and Gauge Specifications to select the right height and mesh thickness for your project
STEP 2) Marking and Installing End Posts

- Using a spade dig a hole for each of the corner, gate and end post locations.
- The holes should be three times wider than the posts.
- The depth of the hole should be 1/3 the length of the post.

- Fill the holes using one of the following options
CONCRETE: For best results fill the holes with 4 inches of gravel and pat it down so that it is compact then add 6 inches of concrete on top. Then put the posts into the wet concrete and allow at least 1 day for the concrete to set. Fill the rest of the hole with dirt.2)
WITHOUT CONCRETE: Put the pole in the middle of the hole then fill the hole full of large stones to hold the pole in place. Then add earth until tight and compact.

IMPORTANT: Use a level to make sure the post is straight then secure it in place. This is important otherwise your fence will not be straight.
STEP 3) Marking and Installing Your Intermediate Posts

- Tie a string tight between your posts.
- The height of the intermediate posts should be the height of the mesh + 50mm (2 inches) so that you have a small gap at the bottom of the fence once it has been installed.

- Mark 3 meters gaps between the corner, gate and end posts which will mark the location of your intermediate posts.
- Dig a hole in each of the middle post locations.
- The holes should be three times wider than the post diameter.
- The depth of the hole should be 1/3 the length of the post.
CONCRETE OPTION: For best results fill the holes with 4 inches of gravel and pat it down so that it is compact then add 6 inches of concrete on top. Then put the posts into the wet concrete and allow at least 1 day to allow concrete to set.
WITHOUT CONCRETE: Plant the pole then ram the hole full of large stones. Then add earth until tight and compact.
IMPORTANT: Use a level to make sure the post is straight then secure it in place. This is otherwise you will have a wonky fence.
STEP 4) Add Tension Bands and Caps to the Posts

- Add tension bands to all posts with the flat side pointing to the outside of the fence.
- If you have corner posts you will need 2 x tensions bands pointing to either side.
- You need to add one less tension band than the height of the fence, in feet. For example
4 feet high fence = 3 tension bands
5 feet high fence = 4 tension bands
6 feet high fence = 5 tension bands

- Add the caps to all posts as follows
- Caps with loops = middle posts (allows the rail to go through)
- Caps without loops = end posts
- Start to tighten all nuts and bolts but leave some slack to allow for adjustments later.
STEP 5) Install the Top Rail

- Push the top rails through the loops in the caps.
- The poles will attach to each other by pushing opposite ends together.
- If the poles are too long cut them with a hacksaw.
- Once the poles are in place fasten all nuts and bolts.
STEP 6) Hang the Mesh

- Starting at one of your end posts start to unroll your mesh along the length of your fence.

- Weave the tension bar through the end of the mesh roll closest to the end post.

- Attach the tension bar to the bottom tension band of the end pole.
- The mesh should also be 2 inches off the ground. If not adjust the height of your tension bands then tighten the bolts.

- Pull the mesh roll tight along the length of the fence removing any slack. At this point you only need to remove slack, you are not permanently tightening the fence yet.

- Add a few wire fence ties to attach the mesh to the top rail.
STEP 7) Stretching the Mesh

- Weave a temporary tension bar about 3ft from your end post.
- Then attach a stretcher bar to the tension bar.
- Attach a fence puller to the stretcher bar and the end post, then crank the tool to tighten the mesh.
- The mesh is tight enough when you can squeeze around 2-4 cm with your hands in the tensioned area of mesh.

- As you tighten the mesh there is likely to be excess mesh that you will want to remove.
- Unravel a strand of wire from the mesh to remove the excess.

- Weave the permanent tension bar through the mesh and tension bands attached to the remaining end pole.
- Then tighten the tension band nuts and bolts.
- Then remove the temporary tension band.

- Secure the mesh to the rail and poles with fence ties.
- Space your ties as follows (this doesn’t need to be exact).
24 inches along the rail
12 inches on the line posts

OPTIONAL (prevents animals from getting under your fence). Weave tension wire through the bottom of the mesh along the length of your fence. Then pull tight and tie to your end posts.
FURTHER READING
- How to Unroll Chain Link Fence – Learn about the correct way to unroll mesh without damaging its twisted construction.
- How to Make a Chain Link Gate – A step by step guide showing you how to make a gate.
- How to Cut a Chain Link Fence – A guide showing you how to cut mesh.
- How to Connect Chain Link Fence – Learn about the correct way to connect mesh.
- How to Tighten Chain Link Fence – A step by step guide showing you how to tighten mesh.
If you are looking to buy materials, please visit our chain link fence shop page for a variety of rolls, sizes and coatings.

Excellent explanation with clear step by step instructions and well thought out diagrams. Thank you.
Thanks for the kind words, Skye!
Glad you found the instructions and diagrams useful. 🙂
Wishing you a great day ahead,
Joy
Any advice on accommodating uneven ground?
Hi Russ,
There are two main methods of installing chain link on uneven ground.
The first one is, you’d have to dig a trench for the fencing to go into, giving the fence a straight appearance.
The second one would be to install the fence about 1 or 2 inches above ground, also making the fence straight.
If by uneven ground you were thinking of a slope, you would have to bias cut the fence. This video has a very clear guide on how to perform this task: https://www.youtube.com/watch?v=GlkcMqawiiE
Hope this helps, and please let us know if you have any further questions.
Kind regards,
Geza
Perfect easy directions
Thanks for the kind words, James!
We’re glad that you’ve found our guide helpful.
We are always trying to make our guides as clear as possible, to make it easier to install a fence like chain link.
Wishing you a wonderful weekend!
Kindest regards,
Geza
I am looking to run a chain link fence 630 feet do I need to add more end posts for support or just the common 2 with all line post in the middle
Hi Dino,
You wouldn’t necessarily need more than 2 end posts, as the line posts and the end posts should provide enough support for the fence to stay straight.
Hope this helps and please don’t hesitate to contact us if you have any further questions.
Kind regards,
Geza
I have a six foot high tight weave chain link fence to install. Will I need two stretcher bars?
Hi Christopher,
You won’t need two stretcher bars, jut one that is reasonably large compared to the total height of the fence (at least half the size).
You can also use two stretcher bars at the same time if you can’t find any larger ones.
Hope this is helpful and please let us know if we can be of any further assistance!
Kind regards,
Joy
Perfect,excellent explanation,thank you so much!
Hi Fannie,
You’re most welcome, glad our guide was helpful to you!
If you have any follow-up questions, please don’t hesitate to get in touch with us.
Kind regards,
Joy
Hi Joy, I just began working in wholesale fence distribution. You diagram has been super helpful to me. Thanks!
Hi Chris,
Thanks for your comment. Happy to hear that the diagram was helpful since that is the main reason we published it.
If you have any further questions, just let us know and we’ll be more than happy to help.
Kind regards,
Joy
good explanation. How many LF are you completing in a day? Concrete vs No Concrete
Hi Jhoel,
Glad to hear you found our guide helpful and explanatory!
Could you please specify what you mean by “LF”?
As for using concrete, it’s advised at least for the end and corner posts to make sure the fence is strong and can be properly tensioned. For intermediate posts, it’s not compulsory but of course, posts will be more secure when concreted into the ground, and the fence will require less maintenance down the line as well.
Hope this is helpful and please let us know if you have any follow-up questions.
Kind regards,
Joy
How many linear feet or meters can you install in a day
Hi Jhoel,
Thanks for clarifying!
That would depend on many factors, such as the hardness of the soil; if you are concreting the posts, whether you are doing all or just the corner/end posts; the height of the fence itself; whether you have help or you’re doing it alone etc.
Generally speaking it’s advised to start prepping the posts, do all of them and then move on to installing the fence once the posts are set in place.
This would mean that at some point, you will have had all the posts in place but only so many linear meters/feet of fence.
I’d say just take your time and make sure to follow all the steps without rushing through it, as it’s going to prevent having to do too many maintenance jobs down the line.
Hope this helps and good luck with your chain link fence installation!
Kind regards,
Joy
Hi, Just cannot fathom how wire is continuously wrapped around a top rail & looped through the mesh helically. You see this method of attachment on low fences around sporting grounds etc. Wire is not as flexible as string for example, must be difficult to thread through the mesh.!!
Hi Phil,
Thanks for getting in touch and for your comment!
If you chose a thinner gauge and more malleable wire, that can easily be looped around the top of the rail and through the mesh.
In this case the wire itself doesn’t have to be really thick and strong, it just needs to hold the fence attached to the rail and the rail would be the one which holds the tension.
Hope this is helpful and please let me know if you have any further questions.
Kind regards,
Erno
With putting in the intermediate posts the article said to take the mesh and ADD 2″, but I have heard you minus 2 for the top Bar to go across.
Hi Craig,
Many thanks for your comment.
Since the top of the mesh would need to be higher than the actual top bar (mesh needs to be attached to the top bar), you can have the intermediate posts a little bit lower as long as they they are not too low (2 inches lower at most otherwise the top of the mesh would sag).
Hope this helps and let me know if you have any further questions.
Kind regards,
Erno
I need 8 tension bars. And that is what I got. But, how do I use the last tension bar to attach to a corner post when it is being used to stretch the mesh?
Hi Richard,
Thanks for getting in touch and for your comment!
The last tension bar can be attached with the help of the tension bands which are secured to the end posts as shown in our guide above.
This way the tensioning bar can tension the chain link while also being attached to it.
As an alternative, you can also use fence ties or tie wire to secure the tensioning bar to the end post if you don’t have tension bands.
Hope this is helpful and please let me know if you need any further help.
Kind regards,
Erno
Thank you for the helpful explanation, John. I live on a corner lot in the city and have an old chain-link fence. I’m wondering if there are ways to replace just the chain-link mesh with something more visually appealing while keeping the existing posts. I find cable railing systems attractive and am curious if I could use my existing posts to install something similar to that. What options do I have for removing the chain-link material and converting it to a more modern cable-style fence?
Hi Moa
Glad to hear you found the explanation helpful. 🙂
If you don’t fancy the look of the chain-link fence and wish to swap it for a cable railing system, you should be able to use the existing posts and attach wire strands to them instead of the mesh, creating a more open and visually unobtrusive fence.
The method used for removing the old fence can vary depending on how it’s attached to the posts currently, but generally speaking, you should be able to cut the wire strands with a stronger pair of wire cutters, and then untwist any remaining bits of wire.
In case it would help you achieve this, we have some other helpful guides which I have linked below:
How to cut chain link fence – https://www.wirefence.co.uk/cut-chain-link-fence/
How to install a tension wire fence (with wooden posts) – https://www.wirefence.co.uk/pdf/WF-PDF-HOW-TO-INSTALL-A-TENSION-WIRE-FENCE-min.pdf
How to install a tension wire fence (with T-posts) – https://www.wirefence.co.uk/pdf/WF-PDF-HOW-TO-INSTALL-A-TENSIONING-WIRE-WITH-T-POSTS-min.pdf
Hope this is helpful, and please let us know how you get on and/or if you need any further advice!
Kind regards,
John
As Fence & Deck Connection, this guide on traditional chain-link fence installation is excellent—clear, thorough, and practical. The step-by-step instructions on posts, tensioning, and mesh handling are right on. Perfect for both DIYers and pros aiming for durability and neat results. Thanks for such a detailed resource.
Hello,
Thanks for the kind words, we’re glad to hear you found our guide helpful!
Wishing you all the best!
Kind regards,
Joy