
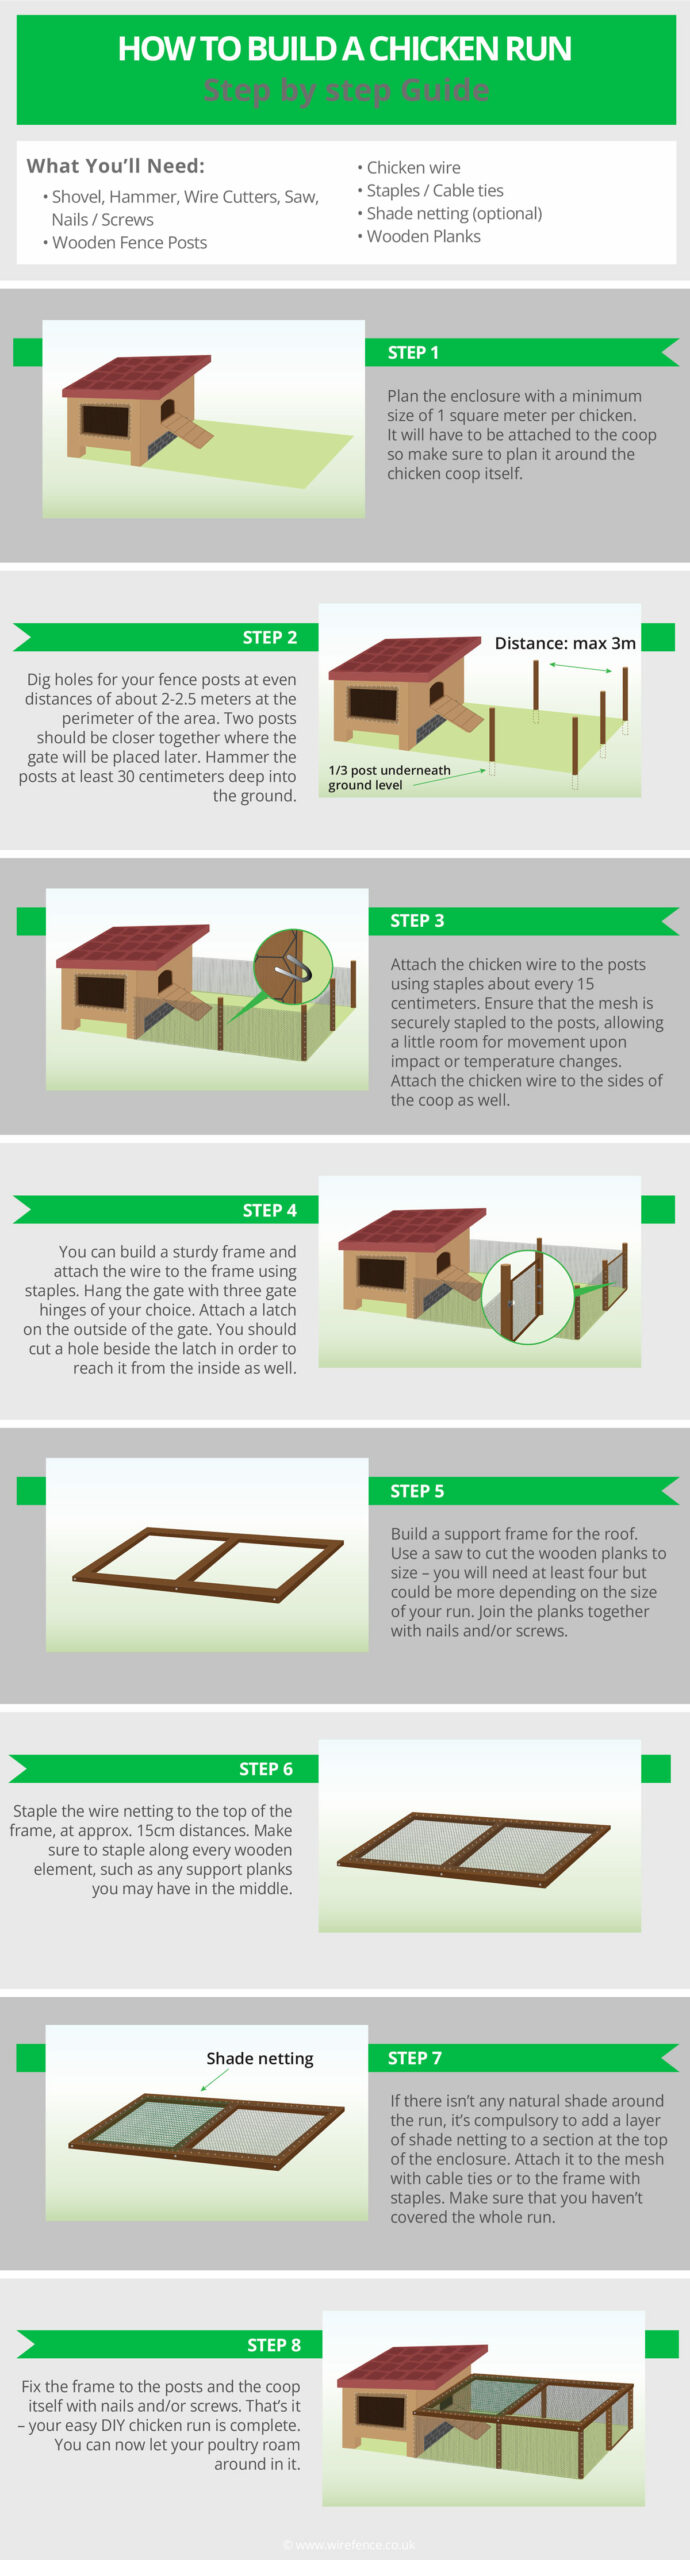
How to Build a Chicken Run

Below you will find a step by step guide on how to build a chicken run for your existing chicken coop.
OVERVIEW
- Estimated Completion Time: 2-3 days
- Experience Required: Medium
- Tools Required: Shovel, Hammer, Wire Cutters, Saw, Nails / Screws
- Materials Required: Chicken wire, Staples / Cable ties, Shade netting (optional), Wooden Planks, Wooden Fence Posts
STEP 1) Plan for Size
- Making a chicken run is quite a big project and it starts with planning the structure thoroughly.
- Plan the enclosure with a minimum size of 1 square meter per chicken.
- It will have to be attached to the coop so make sure to plan it around the chicken coop itself.
STEP 2) Position the Posts
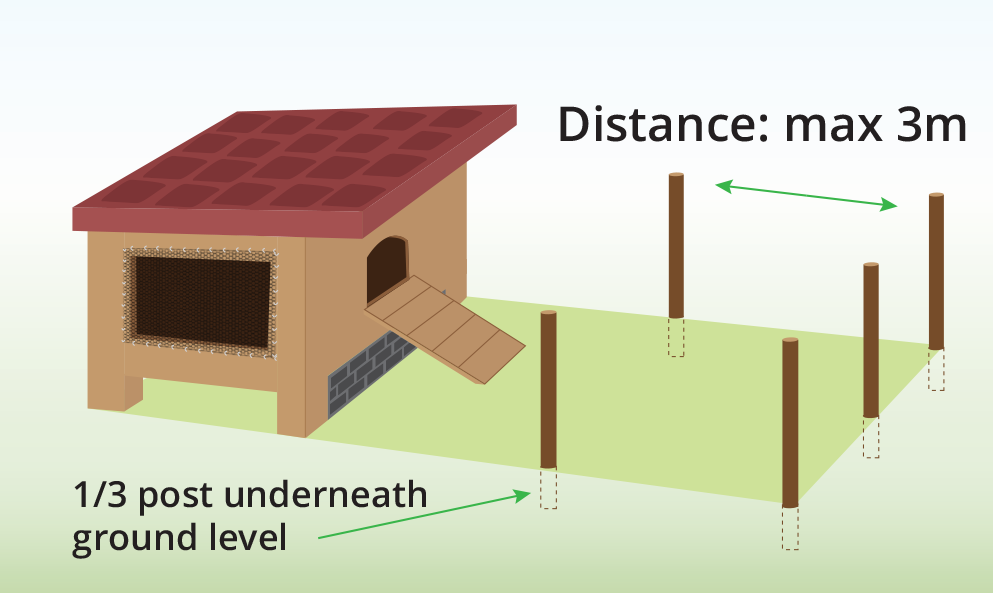
- Dig holes for your fence posts at even distances of about 2-2.5 meters at the perimeter of the area.
- Two posts should be closer together where the gate will be placed later.
- Hammer the posts at least 30 centimeters deep into the ground.
STEP 3) Attach the Chicken Wire
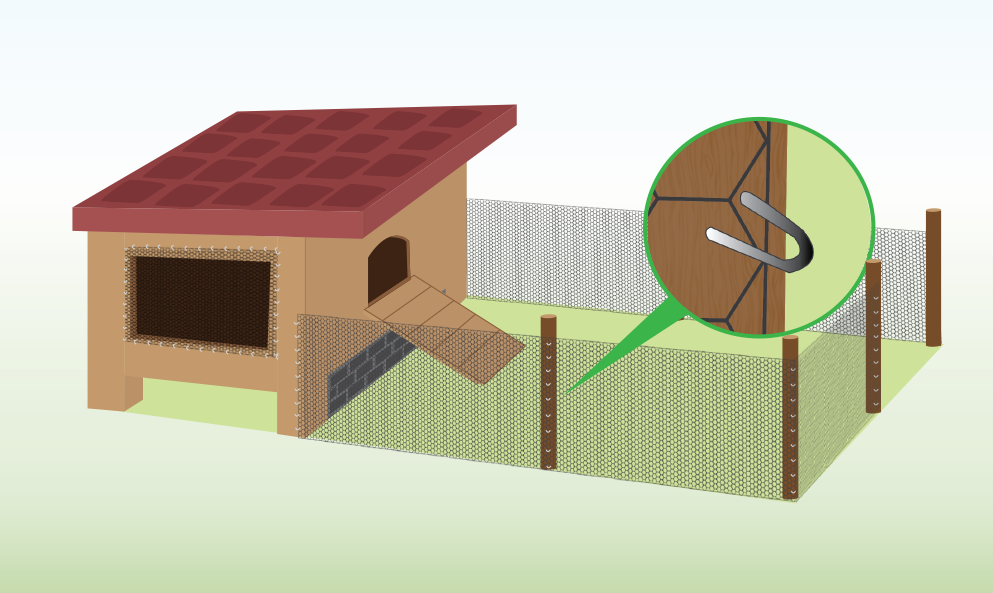
- Attach the chicken wire to the posts using staples about every 15 centimetres. If you need to keep predators out, you will need stronger options. 2mm-thick panels or fox-proof mesh will do the job.
- Ensure that the mesh is securely stapled to the posts, allowing a little room for movement upon impact or temperature changes.
- Attach the chicken wire to the sides of the coop as well.
STEP 4) Add the Gate
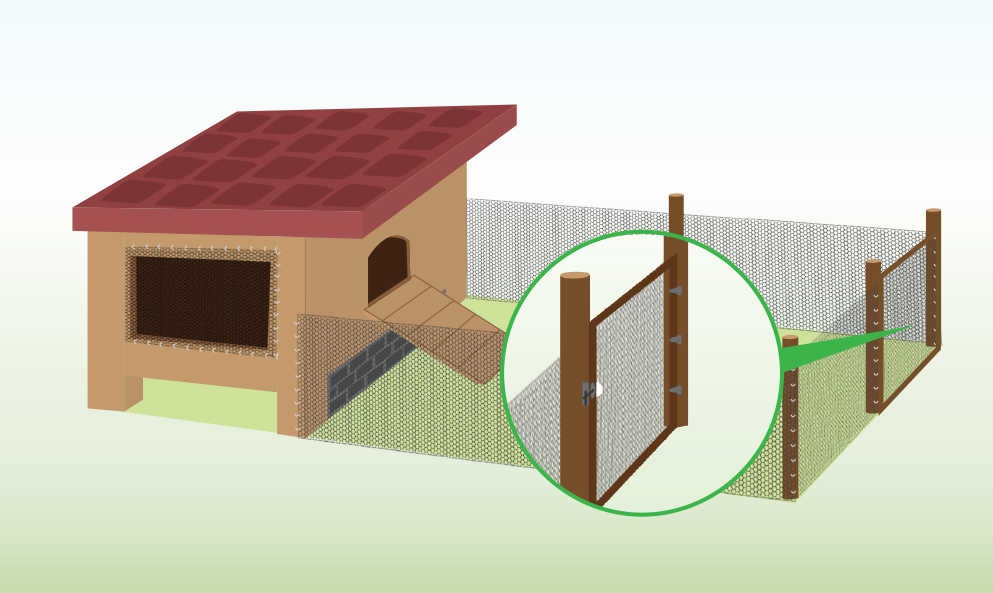
- You can build a sturdy frame and attach the wire to the frame using staples.
- Hang the gate with three gate hinges of your choice.
- Attach a latch on the outside of the gate. You should cut a hole beside the latch in order to reach it from the inside as well.
STEP 5) Build the Top Frame
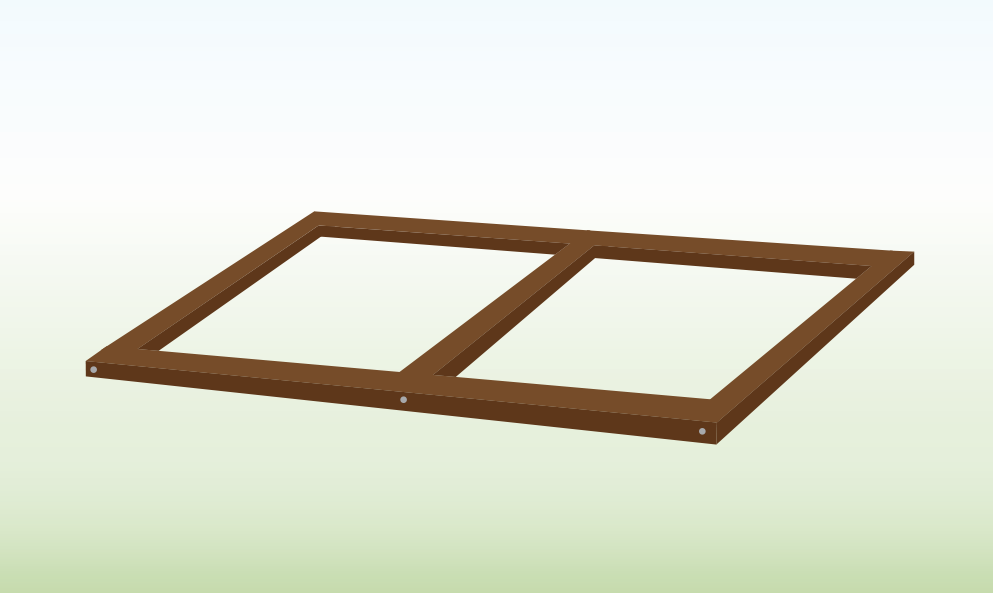
- Build a support frame for the roof.
- Use a saw to cut the wooden planks to size – you will need at least four but could be more depending on the size of your run.
- Join the planks together with nails and/or screws.
STEP 6) Attach the Wire to the Top

- Staple the wire netting to the top of the frame, at approx. 15cm distances.
- Make sure to staple along every wooden element, such as any support planks you may have in the middle.
STEP 7) Cover the Top
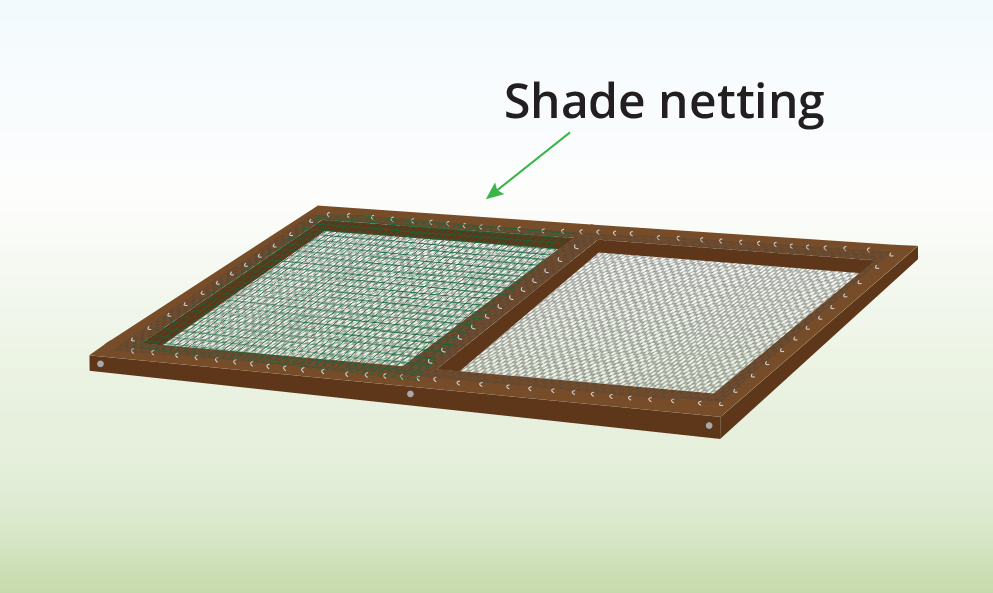
- If there isn’t any natural shade around the run, it’s compulsory to add a layer of shade netting to a section at the top of the enclosure.
- Attach it to the mesh with cable ties or to the frame with staples.
- Make sure that you haven’t covered the whole run.
STEP 8) Attach the Roof to the Run
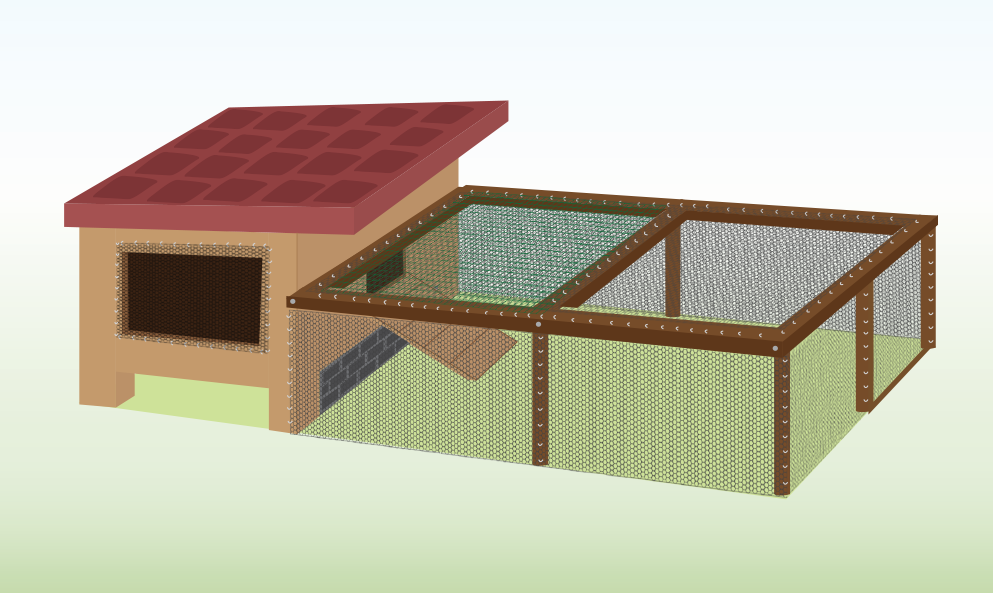
- Fix the frame to the posts and the coop itself with nails and/or screws.
- That’s it – your easy DIY chicken run is complete.
- You can now let your poultry roam around in it. 🙂
TIPS
- When building a chicken run, you can use gravel or concrete to set the posts in the soil.
- For additional security, dig a trench around the perimeter and sink the fencing down a few centimeters.
- If you can find a pre-made gate that matches your project, you can just attach it according to its design.
FURTHER READING
- How to Build a Chicken Coop – Step by step instructions on poultry coop installation.
- How to Make a Temporary Chicken Coop – Learn how to make a temporary poultry enclosure.
- Cutting Chicken Wire – A guide showing you how to cut wire netting.
- How to Unroll Chicken Wire – Learn how to unroll netting properly.

Published by

Thanks for sharing. I’m curious how you keep the coyotes out? Do they ever make their way in? -Danny
Hi Danny,
For coyotes, you would definitely need a heavy gauge wire to step them from getting in. Since the chicken wire is a relatively lightweight type of fence, it wouldn’t be recommended against coyotes.
A heavy gauge welded wire mesh (3mm or above) should be okay to keep your chickens safe from coyotes.
Hope this helps,
Erno
How can you maintain and clean a chicken run to promote a healthy environment for your poultry?
Good morning,
Below you can find a step by step guide on how to clean your chicken run:
Prepare Your Chickens: Before you start cleaning, make sure your chickens are safely contained in their coop or another area so they don’t interfere with the cleaning process.
Remove Debris: Use a rake to remove any larger debris like leaves, straw, or twigs. You can also use a broom to sweep away smaller debris.
Scoop Up Waste: With a shovel, scoop up the soiled bedding and waste (chicken droppings) from the run. Place the waste in a bucket or wheelbarrow.
Dispose of Waste: Properly dispose of the collected waste. You can compost chicken manure if you have a compost pile, but make sure it’s composted properly before using it in your garden. If not, you may need to bag and discard it according to local regulations.
Hose Down the Area: Use a hose with a nozzle attachment to thoroughly rinse the chicken run. This will help remove any remaining dirt and disinfect the area.
Let It Dry: Allow the chicken run to air dry completely before adding fresh bedding. This helps prevent moisture buildup and keeps the area clean.
Add Fresh Bedding: Once the run is dry, spread a fresh layer of bedding material (straw, wood shavings, etc.) over the ground. This will provide a clean and comfortable surface for your chickens.
Return the Chickens: Once the fresh bedding is in place, you can let your chickens back into the run.
Regular Maintenance: To minimize the need for deep cleaning, regularly spot-clean the chicken run by removing fresh droppings and soiled bedding. This will help keep the area cleaner for longer periods.
Monitor Health: Keep an eye on your chickens’ health and behavior. A clean environment is vital for their well-being, as it reduces the risk of diseases and pests.
It’s a good idea to clean the chicken run regularly, such as once a month or as needed based on the size of your flock and the condition of the run. This routine maintenance will help keep your chickens healthy and happy.
Hope this is helpful.
Erno
Hi, how do you keep the rats out? my current run has rats despite us putting aviary mesh way down in to the ground all around.
Hi Tracy,
Sorry to hear that you have issues with rats.
If you want to rat proof the chicken run, you will need to use 6mm x 6mm hole size mesh or smaller as that is the standard rat proof mesh.
If you line your chicken run with that type of mesh, it should keep all kinds of rodents out.
Hope this helps and please let me know if you have any further questions.
Kind regards,
Erno